
Spiral Flower
Yarn used is 4ply yarn ( any material it can be like acrylic ,wool or cotton or any )
Crochet hook used is 2.25mm for 4ply.
Tapestry needle.
Terms used :
SC = Single crochet
HDC= half double crochet
DC= double crochet
TC= Treble crochet
EXPERIENCE NEEDED: for single crochet , HDC,DC, TC. Crab stitch or reverse single crochet .
METHOD :-
Put 13 chains ( 13th chain is only for turning the work around or it can be called a turning chain).

Row 1: Turn and put 1 SC in the second cchain from the hook ( or the 12th chain when counted from the beginning) . put another SC in the next chain ( insert hook under both the loops all the time) totally it is 2 SC’s .

Put 1 HDC in the next two chains ( 1 hdc in each ) total 2 HDC’s .

Work 1 DC in the next three stitches ( one in each ) so total of 3 DC’s.

Now work 5 TC’S in the next 5 stitches ( one in each ) so we have total of 5 TC’s.

After the final TC , chain one and work reverse single crochet or crab stitch and go all the way to the beginning of the work( i.e, starting form sc) and at the end put a chain of 3 ( chain of 3 is for the stsarting of row 2). The crab stitch gives the pattern the kind of rimmed look which is the main thing.

This completes the first petal and row 1.

Row 2: (extra care needed for tthis row J) work 1 sc in the second chain form the hook , work another sc in the next . Total 2 sc’s.

Work a HDC on the previous petals 1st sc and another on the next. ( which is worked behind the crab stitch ). Total 2hdc’s.


Now work 3 dc ‘s ( one in each in the next 3 stitches ) . total of 3dc’s.
Work 1 TC in the next stitch and 2 TC ‘s in the next same stitch and again work 2 TC’s in the next stitch , total of 5 TC’s .
At the end work crab stitch and go back to the beginning of the petal . At the end of crab stitch work 3 chains , which for the starting of the row3.

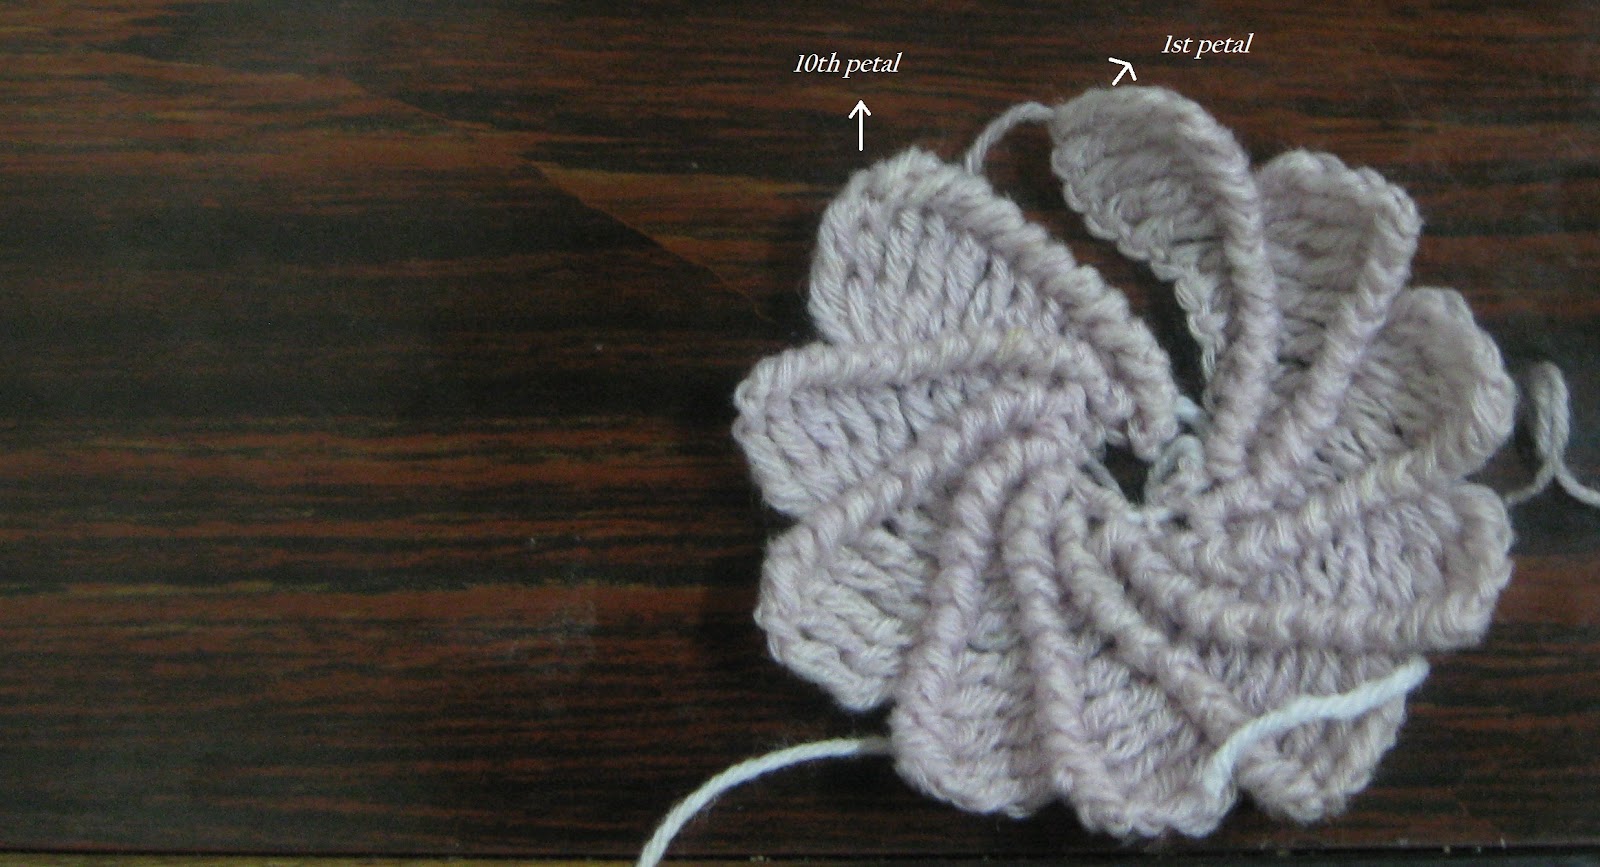
Row 3 – Row 10 : repeat row 2. Each row has a total of 2 sc’s , 2 hdc’s , 3 dc’s , 5 tc’s . Now you have a total of 10 petals.

After row 10 fasten off the yarn ,leave a little yarn about 10cms to sew the 10th petal to the first petal .
But before sewing the edges , take a tapestry needle and add yarn, don’t tie a knot to the end of the yarn added to the needle, leave it free and just pass the yarn at the centre of the flower at the edges through all the petals, make sure the yarn you needled has enough length coming out of both the edges.


Pull the yarn from both the ends till you have that magical closed spiral centre !

Now sew the edges of the 1st and 10th petal .

pull the thread after sewing the edges till the hole in the centre is closed.
Turn the flower back and tie a tight knot maybe 2 or more knots to secure .

Now you should have spiral flower in your hand !!! J

Thanks - looking forward to trying it out. Might even see if I can find a way of adding a central ring to provide a space where the flower can be buttoned onto something.
ReplyDeletegood idea try it out ! :) i hope you have fun with this pattern :)
Delete/i realized that my comment was to far down so I'm sending again. Love the arrows but is there a way to connect them as you are making and turn into a spiral scar? Do a visual.
DeleteThis is awesome thanks so much for sharing.
ReplyDeleteHi , post a picture here after you try it out . I'l be more than happy to see how you did it .
Deletelove the arrows, is there a way connect them to make a spiral scarf? If so would you make a visual.
DeleteThanks for the pattern! It's a beautiful flower. I'm a little bit confused as to where to insert my hook "behind the crab stitch", for making rows 2 and beyond. If you could post a picture of that, it would help a lot!
ReplyDeleteHey Amanda ! I've already posted a pic containing the details have a look .
DeleteHello, Lovely work!!! Thanks for step by step pictures.
ReplyDeletethis is really pretty. :) thank you for sharing how to make it, good tutorial!
ReplyDeleteHello! I came across this pattern just love it! I am the editor of AllFreeCrochet.com and would love to feature your tutorial on my site with full credit to you. I know my readers would love it as well, and in return would generate some nice traffic to your site. If you agree and would like us to feature your project, our readers will simply click the link to your blog to get your full tutorial. It's really that simple. Please let me know if this would be ok. I look forward to hearing from you!
ReplyDeleteJenny
Jbenoit@primecp.com
Hi! Thats great ! I would love to have my tutorial on AllFreeCrochet.com ! I'll be so happy if you add this tutorial to AllFreeCrochet.com . Thanks for coming across this blog :)
DeleteHi, I was wondering if it mattered that much if I use a 2.25mm hook? I tried it with a 3.75mm hook and it turned out a little bunchy and not as tight. Could this be why?
ReplyDeleteHello Samantha !
DeleteYes, because if you use a 2.25 mm hook , it will make the stitches be stiff because since it is a smaller hook it makes stiffer stitch . If you want the stitch to be tighter you have to use smaller hook and if you want not so tight stitch you have to use bigger hook , that is why you got bunchy stitches because you used a bigger 3.75mm hook . It also depends on the thickness of the yarn. If you want to continue with 3.75mm , you have to use a yarn thicker than 4 ply , may be 6 ply or something. Try this out n tell me how it went :).
I love crocheted flowers and pretty much have every pattern, including those I have created, so I was amazed when I found this flower on Pinterest and stopped in my tracks. It is beautiful and perfect for a couple of my projects I have working in my head. Keep up the good work, it's GORGEOUS
ReplyDeleteThank you ! hope you enjoy it !
DeleteThis is a fabulous tutorial, not only is the the flower cute but the accompanying pics are very clear & concise - thank you :-)
ReplyDeleteI've tried this a few times and when I'm finished, my flowers petals don't seem to come together and line up right, and when forded the petals collapse into one another. Would you know why this is happening?? Or how to fix it??? Thanks I absolutely love this flower!!!
ReplyDeleteHello Gary ! I'm uploading a youtube tutorial on this flower and will provide a link here and Will inform you when the video is ready for watching. (: Happy crocheting!
DeleteLa Verdad Que Cada Día me quedo más asombrada, de los nuevos Puntos, nuevos Tejidos, nuevas Formas, en el Mundo del Tejido, mil gracias por compartirlo. Desde Venezuela
ReplyDeleteThanks for the pattern, but I could not make it stand up nor, even with the pictures figure out where to put the stitches for Row 2. I'm left handed that may be the problem. But still a beautiful version of a flower and unique. Keep up the lovely work, and thanks again for posting this free pattern. You are quite adept at crochet.
ReplyDeleteHello Green Tea ! I'm uploading an youtube video on the same.I'l also upload Left handed version of it ! . Will let you know once the left handed version is ready for watching.
DeleteThank you.
Ah, I love this! Thanks for posting, and the pictures are very helpful too :D
ReplyDeleteHi coboscloset !
DeleteThank you for stopping by !
Shirley - followed a link from a newsletter - these are fantastic. A few on a hat would be zippy!
ReplyDeleteThanks for sharing this.
Beautiful flower! It took me about 3 hours to make the first one! I'm incorporating it into a cookie scarf. Thank you so much for sharing your lovely pattern!
ReplyDeleteHi! I love your pattern. I' ve used it on a purse. I was wondering if I can post on my blog a translation into Italian of your pattern. Obviously I would post also the link to your blog.
ReplyDeleteThanks all the same.
Ilaria
Ilgomitolodimomo@gmail.com
How did you make the tiny flower?
ReplyDeleteFirst attept turned out good. Thanks for pattern.
ReplyDeleteAmazing, I like it! Thank you.
ReplyDeleteBeautiful, clear directions. Thank you!
ReplyDeleteBetVictor Casino: The world's leading online sportsbook
ReplyDeleteBetVictor Casino 1xbet korean is the online septcasino betting site for all sports lovers and serious bettors alike. Established febcasino in 2001, BetVictor provides a truly competitive